

Part 1
We'll start off with a simple prop design for the laser device and then the inner core of the beam itself emitting from the muzzle.

I've just made a very simple and typical cartoon canon, ready to shoot out da deadly blue laser beam.

Leave the laser beam muzzle for now, make a new layer on top. Now, make a new symbol (whenever you make a symbol, isolate it on its own layer...ALWAYS). Within this symbol, create a 2 frame cycle on the timeline (2 drawings on 1s).
Choose your angle and position, click and drag the line tool from point to point.
First frame: a single white line (1pt. thickness).

Second frame: keyframe that same line and change it to a 4pt. line.
You can easily change the properties of a straight Line tool-made vector line by selecting it and then increasing the number in the Properties window.
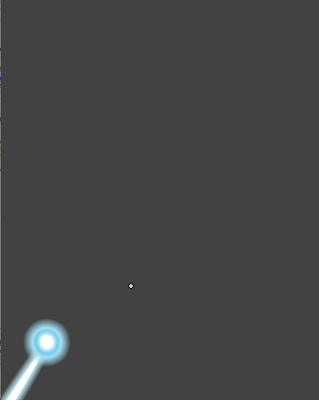
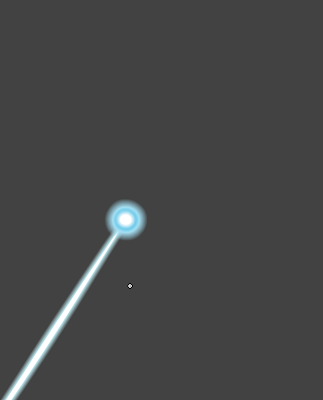
 This is a close-up, the end of the line would line up with the hole from the laser prop.
Now make a new layer underneath.
Create an oval shaped object, paint this object with a radial gradient (with 3 colors) the center pure opaque white, the second a dark 50% alpha blue. and the third (on the outer rim) a full 0% alpha dark blue. Looking like this:

Solid white core fading outwards to a transparent pale dark blue.
Add 50 frames to the timeline (you're still in the same symbol as the 2-frame vibrating line cycle), making this a 52 frame symbol. Select those two line art frames and holding down the ALT key (drag them over to duplicate them over and over) to copy the frames. Another option would be to copy those keys into a new symbol, and dragging that symbol into this timeline.
With the timeline extended, now key frame it half way (frame 26) on your layer with the gradient oval shape. Select the oval shape and drag your tabs in the color mixer's radial gradient settings to widen the central white part to show more solid white.


Then drag the first frame (while holding the ALT key) to the end of the timeline, then Shape tween the first and second KEY frames.
So now it looks like this:

And the layer above it (having the repeating vibrating thin line) looks like this:
 Now for the 'body' of the laser beam.
Make a new gradient shape, this time for a box formation.
Build, stretch and tilt this square shape and paint it with solid white going outward to solid blue.
Now the same process, F6 at frame 26 and 52, frame 52 being the duplicate of frame 1.
Frame 26 being the same stretched square object lined up on a new layer UNDER the white line base and the oval gradient. Shape tween it so it slowly pulsates from large to small, just like the oval shape overtop of it.


So far we have the baseline white line, the slowly pulsating circular glow at the muzzle part where the laser is shooting out from and a thick body traveling down the stream of laser energy.
Now we need to make some darker blue back glows to add more lighting to this laser beam.
Repeat the process, this time place two new layers underneath your current ones and have larger shapes (a thicker rectangle shape and a larger circle shape) I've chosen a deep blue color going from 100% to 0% alpha colors, a linear gradient for the beam section and a radial gradient for the head of the laser. Shape tween both so that the key frame in the middle (frame 26) is slightly larger than frame 1 and 52. Shape tween frame 1 and 26, and observe your results.


Now make another layer, drag it to the bottom so it lays underneath all other layers, draw in a pale dark semi-transparent blue shape matching the head and stream of the laser's path. It helps to make some layers invisible and the rest 'outlines'.
I'm not going to animate this faint glow, but you can if you wish.


Once I've drawn out by paint blob, go to Modify: Shape > Soften Fill Edges...
Choose 144 & 20 as the numbers.
 Remember: Put this on the bottom layer.
Your timeline should now look like this:

The final product should look something like this:

Part 2
There's a million different ways of doing laser beams and sparks, in future posts I'll have more elaborate and wild laser blasts, for now I'm sticking with a thin cutting laser type of effect.
Here's just one of many ways you can do sparks from a cutting laser or blow torch.
First draw out the path of action, five frames of a line shooting out and breaking apart like this should be fine. Apply a slight Soften edges effect to it frame-by-fraem to give it a subtle glow.


Now for the spark blast out.
Start off with a new layer and with just using the brush tool start making a few frames for the head of the spark traveling along the top edge of the straight line then dissipating. Then, each one of the frames convert the art into a symbol.
In each symbol you'll need to make two new layers (3 in all) of various colored-glows.
I started with a small white base, images below are zoomed in to see the details.

Then with a layer underneath a light blue colored paint blob slightly larger.

Then an even lighter and larger oval shaped paint blob.

Notice each one has a larger and wider Soften Edges effect applied to them.
All 3 sandwiched together: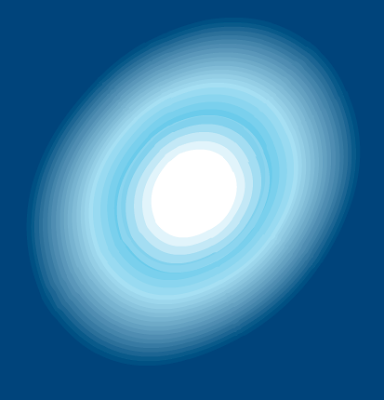

Now to animate this single spark. Place it on the head of your animated line, duplicate it over and over for frames 5 and 6 (where the sparks reaches the end of the line and breaks up), otherwise you simply have this spark symbol on a layer on top of the line as your keyframe it to track on the edge of the line until the line disappears (in this case frames 5 and 6).


Make sure you copy this simple 6-frame animation into its own Graphic symbol.

Now comes the fun part.
Make a new blank symbol (call it spark group), and drag this spark symbol onto the stage, make a new layer and drag it from your Library to the stage again, repeat this process a dozen times.
Now stagger the timing, move the key that each seperate animated symbol appears on your timeline, move the original key that the animation is on and then move the next layer's key over, make sure to put a blank keyframe at the end of the cycle (as shown below) so it doesn't cycle again.
Now change the size, rotation, and placement of the effect to give it some variety.
Now it looks like you animated a whole bunch of different sparks.
This is the beauty of Flash, you can simulate complex effects with (in this case) a single 6 frame animated cycle.

Now that you have this animation isolated in it's own symbol, make a NEW symbol and grab this spark cluster symbol you just finished and do the same thing, drag it from the library on to the blank canvas of another new empty symbol, and spread it out on your timeline, making sure to cut it off from cycling with blank key frames, and again change the size, rotation, placement, and stagger the timing so they burst out at different various times, you can even change the brightness, alpha and tint (in the Properties window once you have the symbol selected) for each cluster of animated symbols to add more variety.
Looking something like this:


Now you must have a big flickering glow from where the laser beam is striking the surface (off screen in this case) in order to sell the final look.
To achieve this make TWO new symbol with only two frames of animation in each.
Make one a faint blue gradient going from the center outwards from white to fully transparent blue, fading out. Make the other a 50% alpha white to 0% alpha white, make both different in shap but both of them large and on a layer behind all other animation, and place these two symbols on the main timeline (underneath the laser, sparks and all other layers).


Here's how it could look:
Now we put it all together.
The more layers and duplicate symbols you have of the sparks, the slower Flash may be responding to your commands - this is because it has a lot to process for when it comes to dozens if not hundred eds of gradients/alphas and glows you may have made to make the sparks really fly.
Here's the final product:
If you choose to add small bits of particle dust amongst the beams outer rim, you could have an effect looking like this:
Simply create a bunch of symbols floating around on slow tweens moving back and forth or in a very slow circular pattern, each one just being a speck of 40% alpha white colored paint blobs.
Using these same principles and techniques you can apply some nice effects to any sort of energy blast, cutting torch, plasma beam type of animation.
Coming up next time: Tornadoes, twisters, smoke fumes, gun shots and explosions!
Till then, here's some amazing reference materials on explosions, over 100 clips found here.
1 comment:
Great site. I'd love to see stuff on fire and "droplets" like water/mud/ect
Post a Comment